Highway peg installation: a sort-of how-to
by Corn Dog on May 14, 2011
in Mods & Equipment
Steve gave me a set of highway peg mounts and footpegs for Mother’s Day, so we had the idea of making a video showing how easy they are to install. Don’t even THINK about pointing out technical errors – I never said I knew what I was doing, but we did have fun making the video!
Sharing the (chrome) love, part 1
by Corn Dog on April 4, 2008
in Mods & Equipment
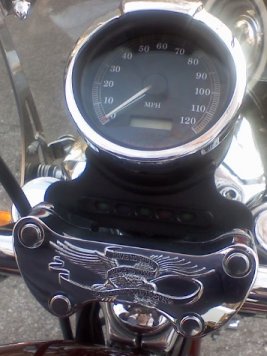
Thought I would just show off the new configuration of my speedometer. I’ve never been crazy about the black, pebble-textured speedo housing. And, we found after we put the pullback risers on that the speedo was sitting at an angle where I could barely read the speed and couldn’t read the mileage at all. So a new configuration was needed.
Steve turned the black housing around so that a bend in the shoulder area would put the speedo at a better angle. He switched out the original black handlebar bracket for a chrome “Live to Ride” version, and bought the neat chrome bezel as well. The problem was, the black housing was supposed to lay on top of the chrome L2R bracket, and when it did, it covered part of the eagle design. Steve’s solution was to bolt the speedo housing to the back of the chrome bracket rather than the top.
The whole thing required a little fabrication on the housing as well as a re-setting of the lights that go across the shoulder piece, and some further noodling to figure out how to show the entire eagle design. What’s neat about it is that the black housing really fades into the background, while the chrome bezel and bracket kind of pop forward, visually. I’m not sure I’ve accurately described it, but the whole setup looks really neat. The L2R bracket matches two other L2R items I have on the bike.
When you can’t ride, BOLT ON!
by Corn Dog on March 3, 2008
in Mods & Equipment
We took advantage of the 60-degree temperature on Sunday as best we could… putting all the chromey bits on the Picky Bitch that I’d gotten for Christmas! Here’s what we added:
- Belt guard cover
- Front axle nut covers
- Rear master-cylinder cover
- Pullback risers
A note on the pullback risers… last fall, my wonderful husband purchased and installed Ape Hanger handlebars for me (you might remember the story about how I didn’t seem to notice!). I noticed after a little riding that my shoulder blades were kind of aching, so we talked about pullback risers. The bike is looking awesome with the risers on there, so I’m really hoping those solved the shoulder-blade problem. Guess we’ll see… in a MONTH or more! (What IS IT with this @#$ winter??)
Ape hanger bars on my Sportster!
by Corn Dog on September 17, 2007
in Mods & Equipment
 Okay so funny story… on Saturday, 2 days before my birthday, we’re going on a ride down to Indianola to the Route 65 Harley open house. I back my bike out of the garage, pull the choke out to warm it up… everyone’s standing around waiting for me as usual. Once the Picky Bitch is warmed up, we saddle up and Steve, Kristin and Hollie and I all head out. I notice that my bike felt kind of funny – different, but not sure how… when I turned that corner off the side street, it felt like my arms were “going wide” to make the turn. And then going down Holcomb St. toward 2nd Ave., my arms felt like they were in a different position. One more turn onto 2nd Ave. and I know something’s different, but still don’t know just what. So as I’m heading down 2nd Ave., I notice my arms are actually sitting higher… and my hands are actually parallel to the ground instead of at an angle… I’VE GOT NEW HANDLEBARS!
Yep, Steve had bought and installed new ape hanger handlebars for my birthday, and it took me THREE BLOCKS to figure it out!! LOL Since I was in the lead I took everyone into a parking lot where I stopped and got off the bike and gave Steve a big hug and kiss… I hope he knows how much I really like them, they are really comfortable! Now all I need to go with them are the Kuryakyn ISO Grips (with Throttle Boss, of course)… and maybe a chrome belt guard… oh! and today up at Big Barn HD we saw a neat seat – the Reach Solo Seat for Sportster… yeah, kinda like getting new drapes – now the living room furniture doesn’t match!
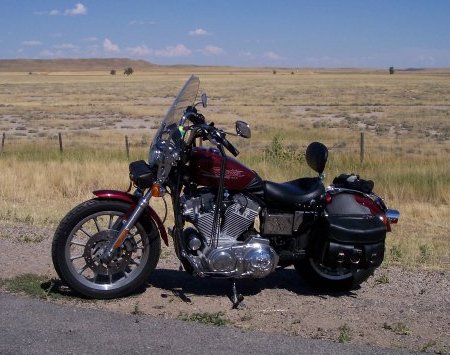
You ride what?? Setting up a Sportster for long-distance rides
by Corn Dog on August 4, 2007
in Mods & Equipment
 I was talking about the Estrogen Ride at work the other day and one of the guys asked me “how in the world” do I have any fun traveling long-distance on a Sportster? It’s true that the Sporty is not really intended to be a touring bike, but mine has been set up with several Harley Davidson parts that make it a whole lot better for road trips than the stock machine. I was fortunate that most of these were already on the bike when I bought it, but they are all things I would have added myself anyway.
Here’s a list of the stuff on the bike that specifically contribute to its long-distance capabilities, at least for me:
- Forward controls kit
- Detachable SuperSport Windshield
- Buckhorn handlebar kit (including longer cables)
- Chrome Luggage rack
With all of these Harley parts and the other stuff I’ve added to the bike, it rides as well as any pre-2004 (non-rubber mount) Sporty can ride. Of course, I love to shop so I have a few Harley accessories on the bike as well that don’t affect it’s touring suitability – but they sure do add to my enjoyment of the bike:
- Leather tank bra
- Live to Ride primary cover
- Chrome oil tank cover
- Straight pipes
Finally, I’ve got a few other HD items still on my wishlist (hey, birthday’s comin’ up – a girl can dream, right??):
- Chrome engine guards with highway pegs
- Color matched hard bags
- Two-up Reach seat with passenger backrest
- Chrome master cylinder cover
- Chrome hand levers’
- Chrome belt guard
- “Buckshot” air cleaner cover
- And, I want to try mini-ape handlebars instead of the buckhorns (what can I say, I love the look!)
Of course, none of this would be necessary if I would just buckle and trade the Sporty in for a Low Rider, but that’s a whole ‘nother can-o-worms!
Sa-weet!
by Corn Dog on April 15, 2006
in Mods & Equipment
Putting drag pipes on the bike this week… they sure sound good! Still working on making the stock heat shields work, but here’s a preview:

The Look for Less
by Corn Dog on March 15, 2006
in Mods & Equipment
There’s a show on the “Style Channel” (yes, I’m a woman of many interests!) called “The Look for Less.” This is the one where the host shows you stylish outfits direct from the fashion runway, and shows you how to shop for similar pieces and create the same look on a budget.
 This theme occurred to me while reading my March ‘06 issue of Iron Works, because I came upon an article where they showed you how to outfit a Sportster for long distance or multi-day riding. As I tallied the cost of this project in my head, I realized that I could do them one better: I had outfitted my own Sporty just last year for this very same purpose, and knew I had done it for a lot less. Now granted, I didn’t achieve the exact same look – but I got the same functionality for a fraction of the price. And, my project was even cheaper because two of the items were already *on* my bike when I bought it used. I counted the cost of those two items in my tally anyway, knowing it would still be cheaper than the magazine’s version.
The magazine outfitted their Sporty using all “official” HD parts. Mine has a few of those, but frankly, you can save some serious bucks by shopping with aftermarket vendors like J&P Cycles. The total price for the magazine’s project, using all HD parts, was $1,985. This included using HD’s new fiberglass color-matched hard bags – which, by the way, look beautiful – which by themselves cost $955.
My project, completed last summer in time to go on my first overnight road trip, included the following accessories:
- Willie & Max “Wild Willie” saddlebags – $144
- Saddle bag supports – $43 (came on the bike)
- Turn signal relocation kit – $33
- Fender-mounted luggage rack & mounting kit – $69
- Sport windshield – $155 (HD brand, came on the bike)
- Leather travel bag, duffel style – $10
The total for my project was $454… If you take into account the fact that I didn’t have to purchase the windshield or the bag supports (because they were on the bike when I bought it), my total cash outlay was only $256. So take your pick… $454, or $256, versus $1,985. Now I’ll grant you, spending more gets you the official HD accessories and those cool color-matched hard bags – fine by me, if that’s the look you want. But to me, the “look” I wanted was less sleek and more casual, and it cost me a boatload less.